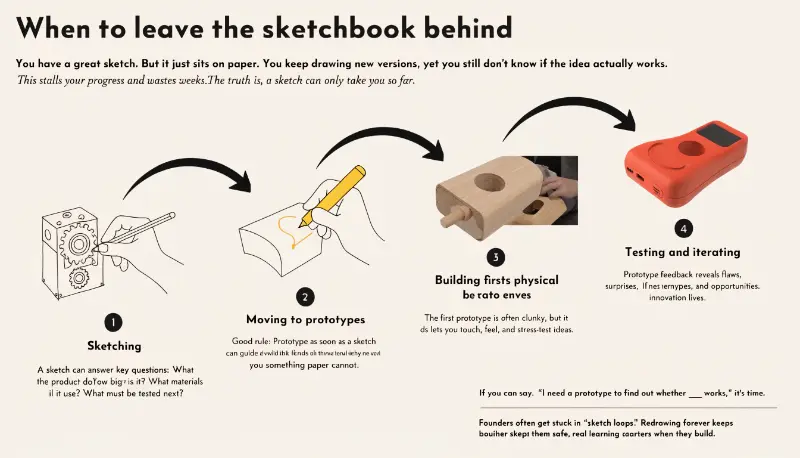
You have a great sketch. But it just sits on paper. You keep drawing new versions, yet you still don’t know if the idea actually works. This stalls your progress and wastes weeks. The truth is, a sketch can only take you so far. At some point, you must build something you can hold, test, and break.1
Move from sketch to physical prototype once your sketch clearly answers the main design questions: what the product does, how big it is, what it’s made of, and what must be tested next. A good rule is to prototype as soon as a sketch can guide a build that teaches you something paper cannot. If you can say, "I need a prototype to find out whether ___ works," it’s time.
I have watched many founders get stuck in "sketch loops." They redraw forever because paper feels safe. But real learning starts when you build. Let me walk you through the exact signs, stages, and steps so you know when to leave the sketchbook behind and start making real parts.
Does a Prototype Need to Be Physical?
Many founders think a prototype must be digital first. So they spend weeks in CAD before touching real material. Then reality hits. The part feels wrong in the hand, the size is off, and the assembly doesn’t fit. That polished digital model taught them almost nothing about the real world.
No, a prototype does not always need to be physical, but the most valuable early prototypes usually are. Digital prototypes test appearance, motion, and dimensions on screen. Physical prototypes test fit, feel, strength, and human interaction in the real world. For hardware products, a rough physical model often reveals problems faster than any 3D file. Start physical the moment you must test something you can touch.
There are different types of prototypes, and each answers a different question. Choosing the right one saves you time and money. Here is a simple comparison I share with founders.
| Prototype Type | Best For | Speed | Cost |
|---|---|---|---|
| Sketch | Exploring ideas fast | Very fast | Very low |
| Digital / CAD | Dimensions, motion, appearance | Fast | Low |
| Foam / Cardboard | Size, shape, basic ergonomics | Fast | Very low |
| 3D Printed | Fit, form, early function | Medium | Medium |
| Functional Prototype | Real testing, materials, strength | Slow | Higher |
The key is matching the prototype to your question. If you want to know how a handle feels, don’t spend two weeks in CAD. Cut foam and grab it. If you want to check if two parts snap together, a quick 3D print works better than a drawing. Digital tools are powerful, but they can hide real-world problems. I always tell founders to mix both. Use digital for precision, and use physical for truth. The goal is learning, not perfection. A cheap, ugly model that reveals a flaw is worth far more than a beautiful render that hides one.
When Should You Move from Sketch to Physical Prototype?
You keep sketching, but the same questions won’t go away. Is it comfortable? Will it fit? Is it strong enough? Paper can’t answer these. The longer you wait, the more assumptions pile up. Then one bad assumption sneaks into your tooling and costs you thousands to fix later.
Move to a physical prototype when your concept is stable and your questions shift from "what should it look like?" to "does it actually work?" You are ready when the sketch has enough detail to estimate dimensions, when you must test fit or ergonomics, and when you need to choose between options. If a rough physical model would reveal the better path faster than more drawing, build it now.
Here are the clear signs I look for before telling a founder to start building.
Signs You Are Ready
- The core concept is stable. You are no longer changing the main idea every single day.
- You need to test fit, ergonomics, strength, assembly, or user interaction in the real world.
- Your sketch has enough detail to estimate real dimensions and constraints.
- You are deciding between a few options, and a rough model would show the winner faster.
Don’t Wait for Perfection
You do not need finished CAD before your first physical mockup. A rough foam, cardboard, clay, or 3D-printed model is often useful before a polished prototype. Most designs improve through many iterations. So the goal of the first prototype is learning, not final quality.
I once worked with a founder who spent two months perfecting a CAD model of a handheld device. When we finally printed it, the grip was too wide for most hands. A five-dollar foam block would have caught that in one afternoon. Don’t let perfection slow you down.
A Simple Practical Trigger
Try finishing this sentence: "I need a physical prototype to find out whether ___ works." If you can fill in the blank, it’s time to build. For example, if a chair sketch looks good but you don’t know if the seat angle is comfortable, a rough mockup is the fastest next step.
What Stage Comes After Prototype?
You finished a prototype that works. Now what? Many founders freeze here. They think the hard part is over. But jumping straight to mass production is a huge mistake. Skipping the validation stages leads to defects, delays, and expensive tooling changes that could have been avoided.
After the prototype stage comes structured validation: EVT, DVT, and PVT. EVT (Engineering Validation Test) confirms the design works. DVT (Design Validation Test) confirms it can be made consistently and passes reliability and compliance tests. PVT (Production Validation Test) confirms your factory can produce it at volume with good quality. These stages turn a working prototype into a real, manufacturable product.
Understanding these stages saves you from painful surprises. Here is how they break down.
| Stage | Main Goal | Key Question | Typical Quantity |
|---|---|---|---|
| Prototype | Prove the concept | Does the idea work? | 1–10 |
| EVT | Validate engineering | Does the design work reliably? | 20–100 |
| DVT | Validate design for manufacturing | Can it be made the same every time? | 100–500 |
| PVT | Validate production | Can the factory scale it? | 500–2,000+ |
Each stage builds on the last. In EVT, you focus on function. You test if the electronics, mechanics, and features perform as planned. In DVT, you lock the design and apply DFM (Design for Manufacturing). You choose final materials, refine tooling, and run compliance and safety tests. In PVT, you run a small production batch on the real factory line. This checks assembly speed, quality control, and yield.
I always tell founders not to rush these steps. Each stage catches problems while they are still cheap to fix. A mistake found in EVT might cost a few hundred dollars. The same mistake found after mass production could cost tens of thousands. Treat these stages as your safety net on the road from prototype to launch.
When Should You Stop Prototyping?
Prototyping is addictive. Every new version feels a little better, so you keep going. But endless iteration burns cash and delays your launch. Meanwhile, competitors ship. At some point, "better" becomes the enemy of "done," and your project stalls in a loop that never ends.
Stop prototyping when your design consistently meets your core requirements for function, fit, cost, and manufacturability, and when new iterations produce only tiny gains. If your prototype passes real user testing, fits your target cost, and can be made with your chosen process, it’s time to freeze the design and move toward production. More changes at this point add risk, not value.
Knowing when to stop is a skill. Here are the signals that tell me a design is ready to lock.
Clear Stopping Signals
- The product reliably does what it should during repeated testing.
- Users understand and enjoy using it without confusion.
- The design fits your target cost and manufacturing method.
- New changes only bring small improvements, not big fixes.
- Your tooling and material choices are final and confirmed.
The Danger of Over-Prototyping
Every extra iteration costs time and money. It also delays feedback from real customers, which is the most valuable feedback of all. I have seen founders polish a prototype for months while their market moved on. Perfect is a trap. Aim for a design that is good enough to launch and improve later.
A helpful mindset is "design freeze." This means you officially stop changes to the main design. Small tweaks may still happen during DVT, but the core stays fixed. A design freeze lets your factory prepare tooling with confidence. It also protects your timeline and budget. Set a clear checklist of requirements early. When your prototype checks every box, stop. Ship it. You can always release version two.
What Is the First Step in Turning a Prototype into a Marketable Product?
Your prototype works, and it looks great. But a working prototype is not a product yet. Turning it into something you can sell, ship, and scale is a different challenge. Many founders underestimate this jump. They assume production is easy, then get crushed by DFM issues, tooling costs, and quality problems.
The first step in transitioning from prototype to marketable product is Design for Manufacturing (DFM). DFM means redesigning your prototype so it can be made consistently, affordably, and at scale. This includes simplifying parts, choosing production materials, planning tooling, and finding the right manufacturing partner. DFM turns a one-off model into a design a factory can reliably reproduce thousands of times.
DFM is where I focus most of my energy with founders, because it saves the most money. Let me explain what it really involves.
Key DFM Actions
- Simplify the design. Fewer parts mean lower cost, faster assembly, and fewer defects.
- Choose production materials. A prototype material may not survive mass production or meet cost targets.
- Plan your tooling. Injection molding tools are expensive, so design parts to reduce mold complexity.
- Design for assembly. Make parts easy to put together, ideally with snaps instead of screws.
- Set quality standards. Define what "good" looks like so your factory can measure it.
Choosing the Right Manufacturing Path
Your production method affects everything. Here is a quick guide for early-stage hardware startups.
| Method | Best For | Startup Cost | Per-Unit Cost |
|---|---|---|---|
| 3D Printing | Very low volume | Low | High |
| CNC Machining | Metal parts, low volume | Medium | Medium |
| Silicone Molding | Small batches, soft parts | Low–Medium | Medium |
| Injection Molding | High volume plastic | High | Low |
Beyond DFM, the first step also means preparing for the business side. This includes cost analysis, supplier selection, and planning your first production run. If you are crowdfunding, this is when you nail down real costs so your Kickstarter or Indiegogo pricing survives contact with reality. Start DFM early, even before your design is fully frozen. The earlier you think about manufacturing, the fewer expensive surprises you’ll face on the road to launch.
Conclusion
Moving from sketch to physical prototype is about timing. Build when your sketch can answer real questions, and when only a physical model can teach you what’s next. After that, follow EVT, DVT, and PVT, stop prototyping when gains get small, and start DFM early. Don’t chase perfection. Chase learning. Ready to build your first prototype? Start today and move your idea closer to launch.
-
"SKETCH2PROTOTYPE: RAPID CONCEPTUAL DESIGN …", https://decode.mit.edu/assets/papers/Sketch2Prototype.pdf. Research in design cognition has documented that physical prototypes engage sensorimotor feedback and reveal structural or ergonomic failures that remain invisible in sketch-based representations, supporting the claim that paper ideation has inherent epistemic limits in product development. Evidence role: mechanism; source type: research. Supports: That physical prototypes enable forms of design learning and feedback that two-dimensional sketches cannot replicate, due to tactile, spatial, and functional testing affordances.. Scope note: Most studies focus on specific domains such as engineering or industrial design and may not generalize equally to all product categories. ↩